Library Contents

Down Arrow
open
Welcome Guest
Aviation Learning Center Document Descent to MDA or DH and Beyond - P-8740-09
Author: Federal Aviation Administration Date: 1996
used for alignment
used for alignment
Viewing Options: View Document as Chapters Chaptersused for alignment View Full Document Full Documentused for alignment View Print-Friendly Document Printer Friendlyused for alignment Search Inside this Document Search Insideused for alignment

Introduction
used for alignment

Note: Some material in this document has been updated from the original.

A common goal for all instrument approaches is to get the pilot (and the aircraft) into a position from where a normal landing can be made, usually with visual references.

The Aeronautical Information Manual) (AIM) defines minimum descent altitude, or MDA, as "the lowest altitude, expressed in feet above mean sea level (MSL), to which descent is authorized on final approach, or during circle-to-land maneuvering, in execution of a standard instrument approach procedure (SIAP) where no electronic glideslope is provided."

The AIM defines decision height, or DH, as "height at which a decision must be made during an instrument landing system (ILS), microwave landing system (MLS), or precision approach radar (PAR) instrument approach to either continue the approach or to execute a missed approach."

This pamphlet is designed to give you some helpful hints and tips to get you safely to the MDA or DH and beyond.

used for alignment
Preflight Preparation
used for alignment

Call Flight Service

When talking to an Automated Flight Service Station (AFSS) briefer, be sure to get all notices to airmen (NOTAMs) pertaining to your flight. These include local NOTAMs (NOTAM-L) for departure and destination, distant NOTAMs (NOTAM-D), and - vital for IFR flight - flight data center (FDC) NOTAMs. Be sure to get not only current NOTAMs, but also those already published in the bi-weekly NOTAMs. If you are using direct user access terminal (DUAT) for your weather briefing information, you will need to use a site-specific airport identifier to get FDC NOTAMs. It may be necessary to call the AFSS to be sure that you have the NOTAMs already published in the bi-weekly NOTAM publication. You might also want to call your destination airport to see if there are any special local "Letters to Airmen" that could affect your flight.

Review Charts

After obtaining a weather briefing and determining which runway is likely to be in use at your destination, review all possible approach charts. Be sure to note any obstructions and their location relative to the airport.

Make sure that you have current enroute, approach, and sectional charts on board. It is not a good idea to switch back and forth between National Aeronautical Charting Office (NACO) and Jeppesen charts; choose one format and use it on a regular basis to ensure that you know exactly where to look for the information you need at any given time. An aircraft cockpit is not the place to familiarize yourself with a chart format that you are not accustomed to using!

You will also want to have all of the approach charts for your destination airport (and also your alternate, if one is required) readily available. Trying to find the right chart when you are also flying the aircraft in instrument meteorological conditions (IMC), especially in single pilot operations, is not consistent with either good judgment or good planning.

Know what your options are with respect to the approach procedures. If the ILS glideslope (GS) fails, are you ready to fly the localizer (LOC) approach? Are you proficient enough with your equipment to fly a GPS approach? Is your equipment legal to use on a GPS approach? Are you equipped -- and proficient -- enough for VOR/DME or NDB approaches? Think through these points in advance. If you do not have the equipment required or the training needed to fly one or more of the approaches at your destination, the best time to figure that out is on the ground. Now is a good time to ensure that all the navigational aids in your aircraft -- VOR, GPS, DME, ADF -- are working properly.

LPV, LNAV, VNAV?

With the advent of satellite navigation, instrument pilots today have a number of new terms to understand on instrument approach procedure charts. It is extremely important for you to understand what these terms mean, and whether your aircraft is equipped to use these minimums. The graphic below is from Figure 5-15 in FAA-H-8261-1, Instrument Procedures Manual.

RNAV Vertical Guidance

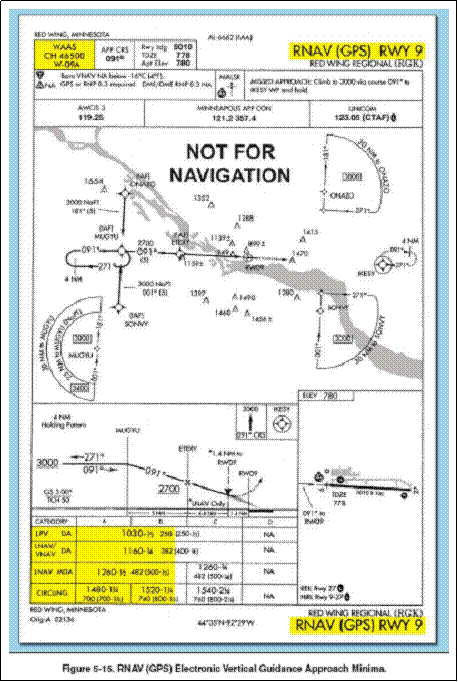
It is a good idea to review the FAA Instrument Procedures Manual (FAA-H-8261-1) to be sure that you fully understand these terms, but here are a few definitions:

  • RNAV: This term refers to "area navigation." There are many different levels of authorizations for use of RNAV approach systems. Factors determining the level of authorization include the type of equipment installed in the aircraft, the redundancy of that equipment, its operational status, the level of flight crew training, the level of the operator's FAA authorization, etc.

  • APV: Approach with vertical guidance.

  • VNAV: VNAV stands for "vertical navigation." Authorization to use VNAV on a conventional nonprecision approach, RNAV approaches, or LNAV/VNAV approaches is found in that operator's OpsSpecs, AFM, or other FAA approved document. Important: Do not assume that a GPS navigator with VNAV capability will produce glideslope-like vertical guidance. On many common GPS navigators, the VNAV function is only a descent planning and situational awareness tool. Know your equipment!

  • LNAV: LNAV stands for "lateral navigation" LNAV minimums are provided for RNAV systems that do not produce any VNAV information. Because vertical guidance is not provided, the procedure minimum altitude is published as an MDA. These minimums are used in the same manner as conventional nonprecision approach minimums. Other RNAV systems require special approval.

  • LPV: LPV is not an acronym, but you might think of it as "localizer performance with vertical guidance." The term refers to APV minimums that use Wide Area Augmentation System (WAAS) to provide electronic vertical guidance capability. Important: Your aircraft must have WAAS avionics equipment approved for these approaches in order to fly to LPV minimums.

  • LNAV/VNAV: Minimums listed as LNAV/VNAV are APV minimums used by aircraft with RNAV equipment that provides both lateral and vertical information in the approach environment, including WAAS avionics approved for LNAV/VNAV approaches, certified barometric-VNAV (Baro-VNAV) systems with an IFR approach approved GPS, certified Baro- VNAV systems with an IFR approach approved WAAS system, or approach certified RNP 0.3 systems. Minimums are shown as DAs because the approaches are flown using an electronic glidepath. Other RNAV systems require special approval.

List Your Information Sources

From the approach charts and the Airport/Facility Directory A/FD, determine whether radar is available. You may also want to know the Minimum Vectoring Altitude for the destination area, to determine if a visual or contact approach is possible.

Find out what sources of weather reporting exist at your destination: ATIS, AWOS, ASOS, etc. and be sure that you have the frequencies for each one readily available.

Review Personal Minimums

Before departing, review your personal minimums and compare them to conditions you expect at departure, while enroute, and at your destination. Take into account how current and proficient you are, your experience level, and your familiarity with the aircraft and its systems. If you are a relatively new instrument pilot, set your minimums high - possibly even VFR or MVFR conditions - until you gain experience in the system, and in the type of aircraft and equipment you will operate. In addition, keep in mind that personal minimums may need to change on any given day. If, for example, you are flying an unfamiliar airplane, or if you are tired from a long day at work, you may not want to attempt low approaches.

Make an Escape Plan

One of the most important things to do in your preflight planning for IFR flight is to find, and plan, your escape route. Don't launch your flight without knowing where to find the nearest present, or forecast, VFR weather that is within range of your aircraft. You might also find it helpful to identify a suitable airport for each 20-30 mile segment of your route. The VFR escape plan could also be very useful in a lost comm situation. (Note: It's a good idea to review lost comm procedures from time to time.)

used for alignment
Enroute Actions
used for alignment

Get Weather Updates

Note: Some information in this section comes from the GA Pilot's Guide to Weather Planning, Weather Self-Briefings, and Weather Decision Making. (http://www.faa.gov/pilots/safety/media/ga_weather_decision_making.pdf)

Staying safe requires staying alert to weather changes. GA pilots and their aircraft operate in (rather than above) most weather. At typical GA aircraft speeds, making a 200-mile trip can leave a two to three hour weather information gap between the preflight briefing and the actual flight. In-flight updates are vital. Sources of enroute weather information include:

Visual Updates. One of the most important things you can do is to look outside. Use your eyes to survey the weather and literally see whether the conditions around you match the conditions that were reported or forecast. Sometimes there are local deviations in weather conditions (isolated cells, fog, etc.) that may not be immediately known to the FSS specialist or that may not appear on weather-product depictions, especially if there is no weather-reporting capability at your departure point. Even if you looked at radar during your preflight briefing process, remember that NEXRAD data is at least 8 minutes old by the time you see it on a display, and older still by the time you are ready to depart. Weather can change very rapidly.

ATIS/ASOS/AWOS. One of the easiest ways to monitor conditions en route is to listen periodically to ATIS and ASOS/AWOS broadcasts along your route. These broadcasts can help you update and validate preflight weather information about conditions along your route of flight. As you approach your destination, be sure to write down information from the current ATIS, ASOS, or AWOS broadcast.

Enroute Flight Advisory Service (EFAS, or Flight Watch). Available on 122.0 in the continental United States from 5,000 AGL to 17,500 MSL (124.67 at higher altitudes), EFAS, addressed as Flight Watch, is a service specifically designed to provide en route aircraft with timely and meaningful weather advisories pertinent to the type of flight intended, route of flight, and altitude. If you are in contact with ATC, request permission to leave the frequency to contact EFAS. Provide your aircraft identification and the name of the VOR nearest to your position.

Air Traffic Control (ATC). Pay attention to the chatter on the ATC frequency. Are other GA aircraft along your route requesting diversions? You can also request information on the present location of weather, which the controller will try to provide if workload permits. Note: Please see the separate Learning Center Library documents on new ATC procedures for describing weather radar echo data to pilots.

Datalink and Weather Avoidance Equipment. Radar and lightning detectors have been available in some GA aircraft for many years. These devices can contribute significantly to weather awareness in the cockpit. An increasing number of GA aircraft are now being equipped with weather datalink equipment, which uses satellites to transmit weather data such as METARs, TAFs, and NEXRAD radar to the cockpit, where it is often shown as an overlay on the multifunction display (MFD). Handheld devices with weather datalink capability are also a popular source of en route weather information. Bear in mind, though, that one of the most important, and critical, things to know about datalink is that regardless of the transmission method, it does not provide "real-time" information and must not be used for "tactical" weather flying.

Brief the Approach

After obtaining the most recent weather from ATIS, ASOS, or AWOS, it is time to review the appropriate approach chart. If you have another qualified pilot on board, ask him or her to brief the approach. If you are operating as a single pilot, brief yourself. You may want to use the following format:

used for alignment Conduct IFR Approach Briefing used for alignment
used for alignmentused for alignmentused for alignment
used for alignment Item  Example used for alignment
used for alignmentused for alignmentused for alignment
used for alignment Type of Approach  "This will be a straight-in VOR approach to Runway 23 at Bedford Airport." used for alignment
used for alignmentused for alignmentused for alignment
used for alignment Frequencies  "VOR frequency is 115.3 MHz; tower is 119.0." used for alignment
used for alignmentused for alignmentused for alignment
used for alignment Headings  "Final approach course is 228 degrees." used for alignment
used for alignmentused for alignmentused for alignment
used for alignment Altitudes  "The MDA for this approach is 680'." used for alignment
used for alignmentused for alignmentused for alignment
used for alignment Rate of Descent  "The required rate of descent is 500 fpm at 120 knots indicated." used for alignment
used for alignmentused for alignmentused for alignment
used for alignment Timing  "Time from FAF to missed approach point is 2 minutes." used for alignment
used for alignmentused for alignmentused for alignment
used for alignment Elevation  "Field elevation is 133; touchdown zone elevation is 333." used for alignment
used for alignmentused for alignmentused for alignment
used for alignment Runway length  "Runway length is 6,500." used for alignment
used for alignmentused for alignmentused for alignment
used for alignment Notes  "ADF required; use Boston altimeter setting if local setting not received."  used for alignment
used for alignmentused for alignmentused for alignment
used for alignment Missed Approach Procedure  "MAP is climbing right turn to 2,000, direct BE LOM and hold." used for alignment
used for alignmentused for alignmentused for alignment

For another approach brief option, see Figure 5-24, FAA-H-8261-1 Instrument Procedures Manual.

Approach Chart Briefing Sequence

To the extent that your equipment permits, set up radios and navigational aids for the approach (e.g., put approach frequencies into the "standby" position on your comm and nav radios). It is also a good idea to set up radios for the missed approach procedure before starting the actual approach.

used for alignment
On the Approach
used for alignment

Complete the Checklist

Before starting the approach, complete as much of the landing checklist as you can. If you have airspeed, altitude, and/or heading "bugs" installed, set them to the appropriate values to give yourself a visual reminder of speeds, altitudes, and headings. As you review and set these values, think about how the wind will affect your aircraft, and how you must maneuver to compensate for it. Note: If there is a large aircraft ahead, plan on staying above the glideslope (GS) to avoid wake turbulence.

Lower the Landing Gear

If you are flying an airplane with retractable gear, it is a good idea to lower the gear when you are 1/2 dot above the GS or at a GS intercept on a precision approach.

On a non-precision approach, lower the gear at the final approach fix (FAF).

If, however, you are going to circle to land in a multi-engine airplane with one engine inoperative, do not extend the landing gear until you are abeam the point of intended landing on the runway in use. This maneuver is very dangerous, and should be attempted only when it is not possible to divert to another airport with better weather or a runway alignment that permits a straight-in approach.

Make Callouts

Once established on the approach, use the profile view for best reference information. Verbal callouts help you maintain situational awareness. If you have another pilot on board, ask him or her to make verbal callouts for 1,000, 500, and 100 feet above minimums for the approach. If you are operating as a single pilot, make the verbal callouts yourself.

used for alignment
When to Descend
used for alignment

What Do you Need?

When you are on an instrument approach, the regulations (14 CFR 91.175(c)(3)) state that you may descend below MDA or DH only if:

  • The aircraft is continuously in a position allowing for normal rate of descent to a landing on the intended runway;

  • The flight visibility is at or above the visibility required to complete the approach; and

  • At least one of the following visual references for the intended runway is distinctly visible and identifiable to the pilot:

  • The approach light system, except that you may not descend below 100 feet above the touchdown zone elevation using the approach lights as a reference unless the red terminating bars or the red side row bars are also distinctly visible and identifiable
  • The threshold.
  • The threshold markings;
  • The threshold lights;
  • The runway end identifier lights;
  • The visual approach slope indicator;
  • The touchdown zone or touchdown zone markings;
  • The runway or runway markings;
  • The runway lights.

VASI or PAPI

When you have visual contact with the runway, fly the Visual Approach Slope Indicator (VASI), if it is available. If you have the aircraft established with a crosswind correction, do not immediately point the nose of the aircraft at the runway when you break out (a natural tendency). Trust your wind correction angle, which will keep you tracking toward the center line until the point you would normally straighten and lower the wind for a normal crosswind landing.

VDP

The Visual Descent Point (VDP) is a defined point on a straight-in, non-precision approach from which you can descend below the MDA, as long as you have the required visual reference. If a VDP is available, it will be indicated by a "v" on the profile view portion of the instrument approach procedure chart. Do not descend below MDA before reaching the VDP.

Stay on the Procedure

The CDI will be more sensitive as you fly closer to the VOR or as you fly inbound on a localizer course, so make your corrections smaller as you get closer. Once you spot the runway, or one of the required visual references, it may be tempting to give up on the procedure. Don't! Unless you are VFR conditions and you have canceled your IFR flight plan with ATC, do not deviate from the published approach procedure. With respect to canceling the IFR flight plan, please do cancel whenever you are in a position to proceed to the airport under VFR conditions. If there is another aircraft awaiting a departure release, especially at a non-towered airport, your IFR cancellation will permit ATC to release the other aircraft.

Circling Approaches

So far, this discussion has focused primarily on straight-in approaches. What are the rules and good practices for safe circle-to-land approaches?

A quick review: a circling maneuver is initiated by the pilot, with ATC approval, to position the aircraft for landing on a runway when a straight-in landing from an instrument approach cannot be done. You must have visual contact with the airport before attempting a circle-to-land maneuver, and you must maintain visual contact with the airport at all times while circling to land.

In a two-pilot operation, the flying pilot should brief the non-flying pilot, before circling, on the direction to be flown after gaining visual contact with the airport. The briefing should also include the missed approach procedure and other pertinent details (see approach brief format in previous chapter). when flying the maneuver, the pilot should limit the bank to 30 degrees, and should remain at or above the MDA while circling. You will be circling well below pattern altitude, so be very careful. Also, remember that you cannot descend from MDA until you are in a position to descend to the runway using normal maneuvers and a normal descent rate.)

After doing the straight-in portion of the approach, you may find it helpful to turn 30 degrees to the runway, if you are landing on the opposite end, and then fly a parallel downwind until in proper position for a base turn. You must execute a missed approach if you lose visual contact with the airport at any point during the maneuver. The recommended practice is to make a climbing turn toward the landing runway until you are safely established on the missed approach course. Unless you have alternate instructions from ATC, fly the missed approach procedure for the approach that you used to get to the circle-to-land point.

A few additional reminders on circle-to-land:

  • Protected airspace for circling approaches is determined by the aircraft's approach category (see tables below.)

used for alignment Maneuvering Table used for alignment
used for alignmentused for alignmentused for alignment
used for alignment Approach Category   A   B   C   D   E used for alignment
used for alignmentused for alignmentused for alignment
used for alignment Speed (Knots)  0-90  91-120  121-140  141-165  Above 165 used for alignment
used for alignmentused for alignmentused for alignment

used for alignment Circling Approach Area Radii used for alignment
used for alignmentused for alignmentused for alignment
used for alignment Approach Category  Radius (Miles) used for alignment
used for alignmentused for alignmentused for alignment
used for alignment A  1.3 used for alignment
used for alignmentused for alignmentused for alignment
used for alignment B  1.5 used for alignment
used for alignmentused for alignmentused for alignment
used for alignment C  1.7 used for alignment
used for alignmentused for alignmentused for alignment
used for alignment D  2.3 used for alignment
used for alignmentused for alignmentused for alignment
used for alignment E  4.5 used for alignment
used for alignmentused for alignmentused for alignment

  • Plan your approach to arrive at the MDA prior to reaching the missed approach point.

  • Always) know your position relative to the initial/final approach fix when you are being vectored. Sometimes ATC might get busy and give you a late turn, which could require a steeper bank than you would like. Since you are pilot in command, ask for vectors to another approach if things don't feel right. If you cannot do what ATC asks you to do, say so.

used for alignment
Resources
used for alignment

Estimating Flight Visibility

How do you determine flight visibility when coming out of the clouds on an approach? If the approach has a lighting system, there are a number of clues in the system itself.

  • Decision bar. Every approach lighting system has a "decision bar" located 1,000 feet from the runway threshold. These lights (or bar) are perpendicular to the approach lighting system.
  • "Rabbit." There is another 1,000 foot clue in the sequenced flashing lights, known to pilots as the "rabbit." The sequenced flashing lights stop at the decision bar.

If you are at the middle marker (MM) and you cannot see the runway threshold, look for the decision bar. Assume that you spot the decision bar. If you know that the MM is six tenths of a nautical mile (0.6) from the threshold, then you have 3,650 feet from the runway. Subtract the 1,000 feet from the threshold, which you cannot see, to the decision bar, which you have spotted, and that leave 2,650 feet -- just under 1/2 mile. If the minimum visibility for this approach is 1/2 mile, then you have the required visibility.

Other Information Sources

  • CFIT Advisory Circular (http://www.airweb.faa.gov/Regulatory_and. . .9FE4D96586256D04006F2065?OpenDocument)

used for alignment
About This Series
used for alignment

The purpose of this series of Federal Aviation Administration (FAA) Aviation Safety Program publications is to provide the aviation community with safety information that is informative, handy, and easy to review. Many of the publications in this series summarize material published in various FAA advisory circulars, handbooks, other publications, and various audiovisual products developed by the FAA and used in its Aviation Safety Program.

Some of the ideas an materials in this series were developed by the aviation industry. The FAA acknowledges the support of the aviation industry and its various trade and membership groups in the production of this series.

Comments regarding these publications should be directed to the National Aviation Safety Program Manager, Federal Aviation Administration, Flight Standards Service.

used for alignment